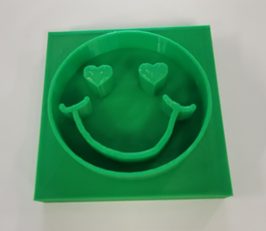
3D Stamp
Learning Objective
For students to explore introductory 3D modeling concepts such as navigating in 3D space, manipulating primitive shapes, and working with measurements. Students will be introduced to 3D printing and the different settings that can be chosen. This project blends CAD with fine arts to show how modern technology can support and even transform ancient art forms such as ceramics and sculpture.
The final piece is a 75mm x 75mm 3D printed functional stamp that can be used with clay. Using additional materials, you may extend this project to utilize the stamp with paper and ink.
This project can be as simple as 3D designing by putting together basic shapes, but can also be extended to using design generators, making complex shapes out of basic ones, and even bringing in 2D graphics to convert to 3D. For young students and true beginners, we will focus on basic shape manipulation.
Estimated Length
1-2 hours class time + fabrication time
Materials
For each student
- 1oz. air-dry clay (1x)
- Laptop with internet access (1x)
- Computer mouse (1x)
For each class
- Various acrylic paints or paint pens (optional)
- Sheets of paper in varying textures (construction paper, bond paper, etc.) (optional)
- Flex Seal Rubber Coating (optional) (1x)
- Large Ink pads (optional) (4-5x)
Setup & Planning
- If possible, create a stamp of your own to demo the project. Think about creating a stamp and then use it to create a clay sculpture. Then, present the sculpture to your class and ask them how they think you made it. See if any of your students can guess that you made it with the help of technology!
- Have each student create a Tinkercad account. Look into setting up a Tinkercad class for easier file management if desired.
- Note: It is a good idea to give students a class period or two to play around in Tinkercad and get a feel for how to move around in 3D space. Additionally, you may want to use some Tinkercad interactive lessons. Students should go to https://www.tinkercad.com/3d-design and scroll down to view the various lessons. “Learning the moves,” and “chess piece” are great ones to have students go through if they haven’t had any Tinkercad experience.
Procedure
Introduction
Intro the activity and emphasize that we will be merging art and technology in this project. 3D prints are often not the final piece of a project. Often, 3D printed parts are used as tools to aid in another project. Here, students will use the stamps to create clay artwork.
Project
- Students may want to sketch their stamp ideas out before they design it! For younger students, you can draw a 75mm x 75mm square or circle on a piece of paper for them to draw inside of.
- Using 3D software (such as TinkerCAD), students will need to start by creating a base shape that is roughly 75mm x 75mm (can be any shape but circles and squares are easy to work with) and 10mm tall.
- Students should begin by placing shapes on the top of their base. The shapes should be around 12 mm tall. If using the stamps on paper, all features must be at the same level so they all can reach the paper when you push down. If using the stamps on clay, different heights of features can be interesting! You can see different levels of depressions on the clay.
- Students can create their designs by:
- Dragging out basic shapes.
- Using shapes turned into holes to remove portions of shapes. For example, a smaller hole circle shape inside a larger circle shape will leave you with a raised circle border. Remember to use the Grouping Tool to merge the solid and hole.
- Using the Scribble Tool to draw their designs
- A combination of all of these.
- Once students are satisfied with their stamp designs, you may want to check them for a few different areas:
- Make sure there are no super thin features (should be at least 2mm thick). Super thin features are fine if the model is going to live its whole life digitally. If something is very thin in Tinkercad, the printer will not be able to even see that feature and it will not print.
- There should be no gaps or floating pieces. All pieces must be touching! If there is a gap or a part is floating in space, the 3D printer will add support material to hold it up while it prints. When you remove the support material, you may end up with two separate parts instead of one.
- After the stamps have been checked, they are ready to be grouped together and exported for 3D printing.
- Experiment with the printed stamps. Use them on clay to create pieces of artwork. Allow the clay to dry and then paint them.
- Have students test their stamps on paper.
- Does the 3D print hold ink well?
- Have them try it again after spraying the stamp with rubber automotive paint. How does it work now?
Tips & Tricks
When 3D printing, make sure the models are flat on the build plate. They shouldn’t need any support material or a raft. Print a few at a time.
Additional Resources
Interested in more STEAM Project-based Learning resources? TinkRworks K-8 supplemental curriculum makes it simple to add hands-on STEAM education to your school. Learn more: www.TinkRworks.com.


